使用 OAuth2/OpenID Connect 保护 Web 应用程序
您将学习如何使用 Vert.x、OAuth2 和 OpenID Connect 构建并保护一个简单的 Web 应用程序。
您将构建什么
在本操作指南的第一部分,您将构建一个安全的 Web 应用程序,该程序将使用 GitHub 对任何应用程序用户进行身份验证。然后,我们将继续探索 API 并使用 OpenID Connect 自动发现应用程序的安全相关配置。
您需要什么
-
文本编辑器或 IDE
-
Java 11 或更高版本
-
一个 GitHub 账户
身份验证基础
在本节中,我们将重点介绍身份验证的基础知识。具体来说,我们将创建一个 Java 服务器,实现 GitHub 的Web 应用程序流程。
注册您的应用程序
首先,您需要注册您的应用程序。每个已注册的 OAuth2 应用程序都会被分配一个唯一的 客户端 ID 和 客户端密钥。客户端密钥不得共享!这包括将其字符串提交到您的存储库中。
您可以随意填写所有信息,除了授权回调 URL。这无疑是设置应用程序最重要的一部分。这是 GitHub 在成功身份验证后将用户重定向到的回调 URL。
由于我们正在运行一个普通的 Vert.x Web 服务器,本地实例的位置设置为 https://:8080。让我们将回调 URL 填写为 https://:8080/callback。
接受用户授权
现在,我们开始填充我们的简单服务器。打开类 howto.oauth_oidc.MainVerticle 并粘贴以下内容
package howto.oauth_oidc;

import io.vertx.core.Future;
import io.vertx.core.VerticleBase;
import io.vertx.ext.auth.oauth2.OAuth2Auth;
import io.vertx.ext.auth.oauth2.providers.GithubAuth;
import io.vertx.ext.web.Router;
import io.vertx.ext.web.handler.OAuth2AuthHandler;
import io.vertx.ext.web.templ.handlebars.HandlebarsTemplateEngine;

public class MainVerticle extends VerticleBase {

  private static final String CLIENT_ID =
    System.getenv("GITHUB_CLIENT_ID");
  private static final String CLIENT_SECRET =
    System.getenv("GITHUB_CLIENT_SECRET");  (1)

  @Override
  public Future<?> start() {

    HandlebarsTemplateEngine engine =
      HandlebarsTemplateEngine.create(vertx);     (2)

    Router router = Router.router(vertx);         (3)

    router.get("/")                               (4)
      .handler(ctx -> {
        // we pass the client id to the template
        ctx.put("client_id", CLIENT_ID);
        // and now delegate to the engine to render it.
        engine.render(ctx.data(), "views/index.hbs")
          .onSuccess(buffer -> {
            ctx.response()
              .putHeader("Content-Type", "text/html")
              .end(buffer);
          })
          .onFailure(ctx::fail);
      });

    OAuth2Auth authProvider = GithubAuth.create(vertx, CLIENT_ID, CLIENT_SECRET);

    router.get("/protected")                      (5)
      .handler(
        OAuth2AuthHandler.create(vertx, authProvider, "https://:8080/callback")   (6)
          .setupCallback(router.route("/callback"))
          .withScope("user:email"))               (7)
      .handler(ctx -> {
        ctx.response()
          .end("Hello protected!");
      });

    return vertx.createHttpServer()                      (8)
      .requestHandler(router)
      .listen(Integer.getInteger("port", 8080))
      .onSuccess(server -> System.out.println("HTTP server started on port: " + server.actualPort()));
  }
}| 1 | 我们将把密钥作为环境变量读取 |
| 2 | 为了使用 Handlebars,我们首先需要创建一个引擎 |
| 3 | 为了简化 Web 组件的开发,我们使用 Router 来路由所有 HTTP 请求,以便以可重用的方式组织代码。 |
| 4 | 应用程序的入口点,这将渲染一个自定义模板。 |
| 5 | 受保护的资源(尚未真正受保护) |
| 6 | 现在我们配置 OAuth2 处理程序,它将设置回调处理程序(如 GitHub 应用程序面板中定义的) |
| 7 | 对于此资源,我们要求用户拥有检索用户电子邮件的权限 |
| 8 | 启动服务器 |
您的客户端 ID 和客户端密钥来自您应用程序的配置页面。您绝不应该将这些值存储在您的 Git 存储库或任何其他公共场所。我们建议将它们存储为环境变量——这正是我们在这里所做的。
请注意,受保护的资源使用范围 user:email 来定义应用程序请求的范围。对于我们的应用程序,我们请求 user:email 范围,以便在本操作指南后续部分读取私人电子邮件地址。
接下来,在项目 resources 中创建模板 views/index.hbs 并粘贴以下内容
<html lang="en">
<body>
<p>
  Well, hello there!
</p>
<p>
  We're going to the protected resource, if there is no
  user in the session we will talk to the GitHub API. Ready?
  <a href="/protected">Click here</a> to begin!
</p>
<p>
  <b>If that link doesn't work</b>, remember to provide
  your own <a href="https://github.com/settings/applications/new">
  Client ID</a>!
</p>
</body>
</html>
(如果您不熟悉 Handlebars 的工作原理,我们建议阅读 Handlebars 指南。)
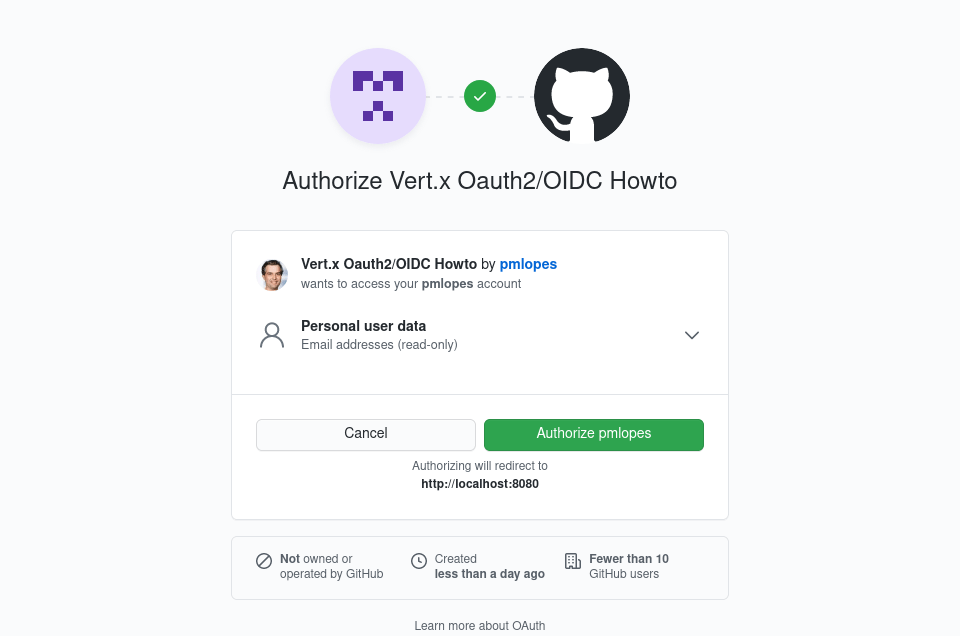
在浏览器中访问 https://:8080。点击链接后,您应该会被带到 GitHub,并看到一个类似的对话框

应用程序成功身份验证后,GitHub 会提供一个临时代码值。此代码随后被回传到 GitHub,以换取一个 access_token,该 access_token 继而会在您的 Vert.x 应用程序中转换为一个 User 实例。所有这些都由处理程序为您完成。
检查已授予的范围
在 User 对象传递给您之前,如果您的处理程序配置了 authorities,它们将首先被检查。如果它们不存在,则整个过程将中止并返回 Authorization (403) 错误。
但是,您可能希望断言其他已授予的权限,在这种情况下,您可以添加一个中间处理程序,例如
AuthorizationHandler.create(
  PermissionBasedAuthorization      (1)
    .create("user:email"))          (2)
    .addAuthorizationProvider(ScopeAuthorization.create(" ")))  (3)
| 1 | 创建一种授权,在这种情况下它是一个权限(Permission) |
| 2 | 我们想要断言的权限 |
| 3 | provider 对象将从用户中提取正确的数据并执行断言 |
如果断言失败,路由器将停止执行并返回 Forbidden 错误。
发出已认证的请求
此时,您的应用程序已经安全,您可以执行处理程序,并且知道用户是真实的 GitHub 用户。您现在可以代表用户执行 API 调用。例如,我们可以更新受保护的资源,以打印出用户注册的电子邮件地址,以及来自 userInfo 端点的一些基本配置文件信息。
package howto.oauth_oidc;

import io.vertx.core.Handler;
import io.vertx.ext.auth.authentication.TokenCredentials;
import io.vertx.ext.auth.oauth2.OAuth2Auth;
import io.vertx.ext.web.RoutingContext;
import io.vertx.ext.web.client.WebClient;
import io.vertx.ext.web.codec.BodyCodec;
import io.vertx.ext.web.templ.handlebars.HandlebarsTemplateEngine;

class ProtectedProfileHandler implements Handler<RoutingContext> {

  private final OAuth2Auth authProvider;
  private final HandlebarsTemplateEngine engine;

  ProtectedProfileHandler(OAuth2Auth authProvider, HandlebarsTemplateEngine engine) {
    this.authProvider = authProvider;
    this.engine = engine;
  }

  @Override
  public void handle(RoutingContext ctx) {
    authProvider
      .userInfo(ctx.user().get())       (1)
      .onFailure(err -> {
        ctx.session().destroy();
        ctx.fail(err);
      })
      .onSuccess(userInfo -> {
        // fetch the user emails from the github API
        WebClient.create(ctx.vertx())
          .getAbs("https://api.github.com/user/emails")
          .authentication(new TokenCredentials(ctx.user().get().<String>get("access_token"))) (2)
          .as(BodyCodec.jsonArray())
          .send()
          .onFailure(err -> {
            ctx.session().destroy();
            ctx.fail(err);
          })
          .onSuccess(res -> {
            userInfo.put("private_emails", res.body());
            // we pass the client info to the template
            ctx.put("userInfo", userInfo);
            // and now delegate to the engine to render it.
            engine.render(ctx.data(), "views/protected.hbs")
              .onSuccess(buffer -> {
                ctx.response()
                  .putHeader("Content-Type", "text/html")
                  .end(buffer);
              })
              .onFailure(ctx::fail);
          });
      });
  }
}| 1 | 从 OAuth2 userInfo 端点获取用户信息 |
| 2 | 代表用户发起 API 调用(使用其访问令牌) |
我们可以对结果进行任何操作。在这种情况下,我们只将它们直接输出到 protected.hbs
<html lang="en">
<body>
<p>Well, well, well, {{userInfo.login}}!</p>
<p>
  {{#if userInfo.email}} It looks like your public email
    address is {{userInfo.email}}.
  {{else}} It looks like you don't have a public email.
    That's cool.
  {{/if}}
</p>
<p>
  {{#if userInfo.private_emails}}
    With your permission, we were also able to dig up your
    private email addresses:
    {{#each userInfo.private_emails}}
      {{email}}{{#unless @last}},{{/unless}}
    {{/each}}
  {{else}}
    Also, you're a bit secretive about your private email
    addresses.
  {{/if}}
</p>
</body>
</html>
您应该会看到一个类似的简单屏幕

实现“持久”身份验证
如果我们要求用户每次访问网页时都登录应用程序,那将是一个非常糟糕的模型。例如,尝试直接导航到 https://:8080/protected。您将一次又一次地收到身份验证请求。
如果我们能够绕过整个“点击此处”的过程,并且只要用户已登录 GitHub,就记住他们应该能够访问此应用程序,那该怎么办?请系好安全带,因为这正是我们要做的。
我们上面介绍的服务器相当简单。为了嵌入一些智能身份验证,我们将切换到使用会话来存储令牌。这将使身份验证对用户透明。
这可以通过现成的处理程序实现,因此我们的服务器文件将是
  @Override
  public Future<?> start() {

    HandlebarsTemplateEngine engine =
      HandlebarsTemplateEngine.create(vertx);

    Router router = Router.router(vertx);

    router.route()
      .handler(SessionHandler
        .create(LocalSessionStore.create(vertx)));  (1)

    router.get("/")
      .handler(ctx -> {
        // we pass the client id to the template
        ctx.put("client_id", CLIENT_ID);
        // and now delegate to the engine to render it.
        engine.render(ctx.data(), "views/index.hbs")
          .onSuccess(buffer -> {
            ctx.response()
              .putHeader("Content-Type", "text/html")
              .end(buffer);
          })
          .onFailure(ctx::fail);
      });

// ...| 1 | 使用内存存储的会话处理程序现在将能够跟踪活跃用户,并且您无需在每次请求时重新登录。 |
为什么持久性很重要?
虽然在服务器上不保留任何状态可能听起来更好,但持久性相对于无状态有一些优势。当会话可用时,您的应用程序将更安全。原因是 OAuth2 在调用期间使用 nonce/state 值,只有在会话存在时才能正确验证这些值。通过会话,我们确保 nonce 值是唯一的且不可重复使用,从而保护您的应用程序免受重放攻击。
第二层可选的保护是使用用于代码交换的证明密钥 (PKCE)。PKCE 在您的应用程序和 OAuth2 服务器之间的交换中增加了另一层安全性,要启用它,您只需将处理程序配置为
OAuth2AuthHandler.create(vertx, authProvider)
  .setupCallback(router.route("/callback"))
  .withScope("user:email")
  .pkceVerifierLength(64);  (1)
| 1 | 通过指定 64 到 128 之间的长度,PKCE 将被启用 |
OpenID Connect
到目前为止,我们一直在介绍纯粹的 OAuth2。Vert.x 也允许您使用 OpenID Connect。
简而言之,OpenID Connect 是构建在 OAuth 2.0 协议之上的一个简单身份层。主要区别在于令牌不是不透明的字符串,而是以 JSON Web Token 格式编码。这使得应用程序能够对权限/角色进行更精细的控制,并减少与 IdP 服务器的往返次数。这也意味着您在启动应用程序时需要预先了解更多信息。例如,一些额外的 HTTP 端点、安全密钥等等。
尽管这看起来更复杂,但 OpenID 定义了一个发现 API,它将设置简化为仅几行代码。您无需了解所有属性,只需(例如)在使用 Keycloak 时发现配置即可。
package howto.oauth_oidc;

import io.vertx.core.AbstractVerticle;
import io.vertx.core.Promise;
import io.vertx.ext.auth.oauth2.OAuth2Options;
import io.vertx.ext.auth.oauth2.providers.KeycloakAuth;

public class KeycloakDiscoverVerticle extends AbstractVerticle {

  private static final String CLIENT_ID =
    System.getenv("KEYCLOAK_CLIENT_ID");
  private static final String CLIENT_SECRET =
    System.getenv("KEYCLOAK_CLIENT_SECRET");

  @Override
  public void start(Promise<Void> startPromise) {
    OAuth2Options options = new OAuth2Options()
      .setClientId(CLIENT_ID)
      .setClientSecret(CLIENT_SECRET)
      .setTenant("vertx-test")          (1)
      .setSite("https://your.keycloak.instance/auth/realms/{tenant}"); (2)

    KeycloakAuth
      .discover(vertx, options)
      .onFailure(startPromise::fail)
      .onSuccess(authProvider -> {
        // use the authProvider like before to
        // protect your application
      });
  }
}| 1 | Keycloak 可以托管多个应用程序,因此我们可以指定租户名称 |
| 2 | Keycloak 服务器 URL |
发现过程将执行所有已知 HTTP 端点的配置,并加载用于验证令牌的安全密钥。准备就绪后,将像之前一样返回一个 OAuth2Auth 实例。这里重要的是,您无需手动加载和配置所有这些。
发现 (Discovery) 是一项标准,因此您可以将其与其他支持它的服务一起使用,例如(不分先后)
-
Microsoft Azure
-
Google Cloud
-
Salesforce
-
Amazon Incognito
-
等等
总结
在本操作指南中,我们涵盖了
-
创建 Web 项目
-
使用 OAuth2 保护 Web 应用程序
-
使用 WebClient 和 OAuth2 调用安全 API
-
持久化用户会话数据
-
使用 OpenID Connect
希望您现在能够在您的下一个项目中应用 OAuth2!